Running a small business involves carefully managing your finances, including paying bills and vendors on time Rather than handling payments manually, QuickBooks Online offers a powerful bill pay system to automate and simplify the process
With over 3.4 million subscribers, QuickBooks Online is the leading accounting software for small businesses. Integrated bill payment capabilities allow users to optimize accounts payable workflows right within QuickBooks.
In this comprehensive guide, we’ll explore how QuickBooks Online Bill Pay works to save you time and effort when managing bills and payments.
Overview of QuickBooks Online Bill Pay
QuickBooks Online Bill Pay is an add-on service that lets you track bills, schedule payments, and remit funds to vendors directly within the software
It syncs seamlessly with the existing QuickBooks Online interface. All your bill and payment data integrates with your books so you have full visibility into what’s due and when.
Key benefits include:
- Pay bills online by bank transfer or check
- Schedule one-time and recurring payments
- Automate billing workflows
- Track due dates and cash flow
- Attach bill images and documents
- Organize bills and payments in one place
QuickBooks Online offers three pricing tiers for Bill Pay to fit different business needs:
- Basic – $0/month
- Premium – $15/month
- Elite – $90/month
Higher tiers include unlimited payments, approvals, 1099 tax forms, and other advanced features. But all levels provide more efficiency than manual bill pay.
Setting Up Bill Pay in QuickBooks Online
Activating Bill Pay is simple within your QuickBooks Online account. Just follow these steps to get started:
- Log into your QuickBooks Online dashboard
- Navigate to the Products tab and click Bill Pay
- Select your plan and click Get Started
- Enter your business account details to verify
- Review and accept the terms and click Confirm
Next, QuickBooks will guide you through connecting your business bank accounts that will be used to pay bills.
Once your accounts are linked, you’re ready to start using Bill Pay!
Creating Bills in QuickBooks Online
When you receive a bill or invoice from a vendor, the first step is entering it into QuickBooks Online. Here are two ways to do this:
-
Manually create bills – Open the Bills page and click New Bill. Enter the vendor, amount due, due date, and other details.
-
Import bills – If the vendor emails an invoice, you can upload it to auto-populate a bill draft. Just download the PDF invoice and import it.
As you enter bills, QuickBooks will track what’s due and pending payment in one centralized Bills page. You’ll get reminders when bills are approaching due dates too.
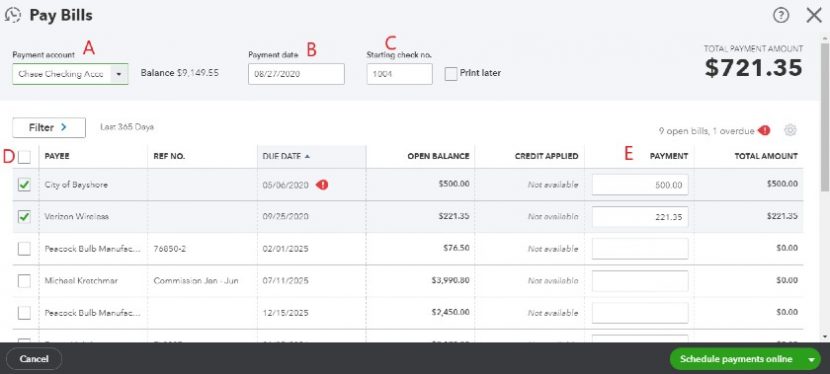
Paying Bills Through QuickBooks Online
Once your bills are in the system, it’s time to pay them.
Navigate to the Bills page and select one or more bills. Click Pay Selected Bills and choose a payment method:
- ACH/Bank Transfer – Free, arrives in 3-5 days
- Check – $1.50 per check, arrives in 8-10 days
- Faster ACH – $10 transfer fee, arrives next day
Enter the payment date and any memo notes. Confirm the payment details and submit it. QuickBooks will record the transaction in your books and handle sending the payment.
Scheduling Future Payments
Rather than paying bills as one-off transactions, QuickBooks Online lets you schedule payments in advance.
When viewing a bill, choose Schedule Payment or Save and Schedule Payment. Pick a future delivery date and payment method.
Scheduled payments will process automatically on their set date. Batch schedule multiple bill payments at once to save even more time.
Setting Up Recurring Bills
If you pay the same monthly bills like rent or utilities, set these up as recurring transactions.
Go to the Recurring Bills page and click New Recurring Bill. Enter the vendor, amount, frequency, and bill details.
These recurring bills will auto-generate with the same amount each period. You can bulk pay recurring bills in fewer clicks.
Automating Bill Workflows
QuickBooks Bill Pay Premium and Elite plans include advanced features to further automate billing tasks.
Set up approval rules so certain bills get routed to managers or accountants before payment. Define thresholds for who can approve different dollar amounts.
You can also create reminders to be notified when a pending bill requires approval or when a scheduled payment is approaching.
Automatic bill sync with vendors like AT&T and PayPal pulls in the latest bills to review and pay. QuickBooks Bill Pay intergrates with your processes for maximum efficiency.
Tracking Payment History & Expenses
All bills and payments made through QuickBooks Online Bill Pay are stored and searchable within the software.
Run reports on transaction history, pending bills, expenses by vendor, and other insights. All data flows into business expense and tax reporting.
Batch print or download payment records anytime. Mark bills as paid when checks clear your bank. QuickBooks keeps everything organized in one place.
Key Benefits of QuickBooks Bill Pay
Streamlining your accounts payable workflows through QuickBooks Online Bill Pay provides a range of benefits:
-
Pay bills without writing checks – Make electronic payments right in QuickBooks instead of manual checks.
-
Schedule future payments – Set payment dates in advance and retain control over cash flow.
-
Reduce late fees – Automate reminders prevent missing deadlines and incurring penalties.
-
Organize finances – Sync bills and payments with accounting system.
-
Access payment history – Run bill payment reports with a few clicks.
-
Increase visibility – See what’s due at any time through QuickBooks dashboard.
-
Work smarter – Less time spent on billing admin means more time growing your business.
Is QuickBooks Bill Pay Right for Your Business?
If your current bill pay process involves stacks of paper bills and writing checks, QuickBooks Online Bill Pay is likely the solution you need.
Key signs it’s time to modernize billing:
- Missing bill due dates
- Forgetting who’s been paid
- Manual payment tracking in spreadsheets
- No cash flow visibility as bills come in
- Difficulty scaling bill management as your business grows
QuickBooks Bill Pay provides the automation and organization to resolve these challenges. Simplify payments and accounting so you can focus on your business, not paperwork.
Summary
QuickBooks Online Bill Pay transforms how small businesses handle accounts payable. Key features like scheduled payments, approvals, reminders, reporting, and integrations streamline the entire bill payment process within QuickBooks Online.
This saves significant time compared to traditional manual payment workflows. The different pricing tiers ensure there’s a Bill Pay option fit for any business needs and budget.
If your current system for paying bills is disjointed and slowing you down, it’s time to leverage QuickBooks Bill Pay. Integrating bill management and payments provides visibility and control over your finances so your business can scale.
Enter bills into QuickBooks
After you get a bill from a vendor, heres how to record it:
- Select + New.
- Select Bill.
- From the Vendor ▼ dropdown, select a vendor.
- From the Terms ▼ dropdown, select the bills terms. This is when your vendor expects to be paid.
- Enter the Bill date, Due date, and Bill no. as theyre recorded on the bill.
- Enter the bill details in the Category details section. From the Category dropdown, select the expense account you use to track expense transactions. Then enter a description. Tip: You can also enter specific products and services in the Item details section to itemize the bill.
- Enter the Amount and tax.
- If you plan to bill a customer for the expense, select the Billable checkbox and enter their name in the Customer field. Learn more about billable expenses.
- When youre done, select Save and close.
Bills added manually appear directly in the Unpaid tab. Because you added the bill, you don’t need to review it.
Review and manage bills
- Sign in to your QuickBooks Online account.
- Go to Expenses, then Bills (Take me there).
- The Bills page contains the For review, Unpaid, and Paid tabs. Select one of the tabs to view bills in that status and see available Actions:
- For review: This tab lists all of the bills pending your review, including bills sent by other QuickBooks users through the QuickBooks Business Network.
- Review: Opens the details of the bill so you can verify accuracy, then Save it to move it to the Unpaid tab, or schedule payment.
- Save: Adds the bill to your Unpaid tab. If the bill is for $0.00, then it’s added to the Paid tab instead.
- Unpaid: This tab lists all of your unpaid bills and if they are due later, soon, or overdue.
- Schedule payment: Use a QuickBooks connected bank or credit card to pay for the bill.
- Mark as paid: Use for offline payments that are not directly scheduled through QuickBooks.
- View/Edit: Make any needed changes to the bill, then select either Save, Save and schedule payment, or Mark as paid.
- Paid: This tab lists all of your paid bills and any linked payments. Select any bill to view details.
- For review: This tab lists all of the bills pending your review, including bills sent by other QuickBooks users through the QuickBooks Business Network.
How to add and pay bills in QuickBooks Online
FAQ
How do I record bill payment in QuickBooks Online?
How do I pay an expense a bill in QuickBooks Online?
What are the payment options for QuickBooks Online?
How do I pay bills online in QuickBooks?
All you need to do is enter your bank account information to pay bills online, directly inside QuickBooks. You can settle invoices, balance books, and schedule bill payments in real-time. First, you’ll decide how you’d like to complete the online payment. QuickBooks Checking: Use your QuickBooks Checking account to pay bills directly.
How do I remove a bill in QuickBooks Online?
Remove bills When you remove a bill, it is no longer available in Online Bill Pay, but it remains recorded in Expenses in QuickBooks Online. Login to your QuickBooks Online account. Navigate to the Pay bills onlinepage by any of the following: Select + New. Then, select Pay Bills Online Selecting the Bill Pay Online dashboard widget
What happened to QuickBooks Desktop bill pay?
QuickBooks Desktop Bill Pay provided by Fiserv was retired on December 2, 2019. You’ll need to find an alternative solution to process online bill payments through QuickBooks Desktop. We encourage you to consult your bank or financial institution for other options.