Paying bills is a necessary but often tedious task for any business. However, with Quickbooks, you can streamline and automate the bill paying process to save time and avoid late fees. In this comprehensive guide, we will walk through the steps for paying bills in both Quickbooks Online and Quickbooks Desktop.
Getting Started with Bill Pay in Quickbooks
The first step is accessing the Bills page in your Quickbooks account. Here’s how for both versions:
Quickbooks Online
- Sign in to your Quickbooks Online company file.
- Select “Expenses” then click on “Bills”. This will bring you to the Bills page.
Quickbooks Desktop
- Open your Quickbooks Desktop file.
- Click on “Vendors” in the top menu bar.
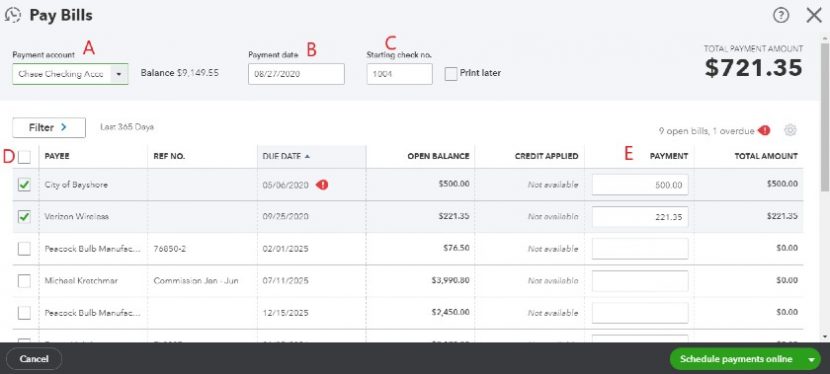
- Select “Pay Bills” from the dropdown menu. This will open the Pay Bills window.
The Bills page or Pay Bills window shows all outstanding bills owed to vendors. From here, you can view bill details, record payments, and more.
Reviewing Bills in Quickbooks
Before paying a bill, it’s important to review the details like amount owed and due date for accuracy. Here’s how to review bills in Quickbooks:
Quickbooks Online:
- Bills are organized into tabs like “For Review”, “Unpaid”, and “Paid”. Click on a tab to view bills in that status.
- To review a bill, click “Review”. This opens the bill details. Verify information is correct.
- Once reviewed, click “Save” to move bill to Unpaid tab.
Quickbooks Desktop:
- In the Pay Bills window, click the checkbox next to a bill to select it.
- Click “Go to Bill” to open and review the bill details. Verify information is correct.
- Click “Close” when done reviewing to return to Pay Bills window.
Reviewing bills helps catch any discrepancies with vendors early!
Paying Bills Through Quickbooks
Once bills are reviewed, it’s time to record payments. There are a few ways to pay bills directly through Quickbooks:
1. Pay Online Through Quickbooks Bill Pay
Quickbooks Bill Pay lets you securely pay bills directly from Quickbooks.
Quickbooks Online:
- From the Unpaid Bills tab, click “Schedule Payment” next to a bill.
- Select payment method, enter amount paying, select date, and click “Schedule Payment”.
Quickbooks Desktop:
- In Pay Bills, select a bill then click “Pay Online”.
- Enter payment info like amount and date, then click “Pay Selected Bills”.
Funds are transferred from your bank account to the vendor’s account. The payment is automatically logged in Quickbooks for easy reconciliation.
2. Record a Check Payment
You can record printing and sending a physical check to the vendor in Quickbooks.
Quickbooks Online:
- Click “+” and select “Check”.
- Fill in check details including vendor, account, amount, and click “Save & Close”.
Quickbooks Desktop:
- In Pay Bills, select bill you’re paying then select “To be printed” as payment method.
- Click “Pay Selected Bills”. The check will be added to the queue to print.
3. Enter Credit Card Payments
Paying bills with a credit card allows you to track expenses while delaying payment.
Quickbooks Online:
- Click “+” and select “Pay Bills”.
- Select credit card account, choose bills, enter amounts to pay, and click “Save”.
Quickbooks Desktop:
- In Pay Bills, choose the credit card account as payment method.
- Enter amounts to pay each bill and click “Pay Selected Bills”.
The payments will show on your next credit card statement. Quickbooks tracks the transactions so you can reconcile later.
4. Record Offline Payments
For cash, debit card, eCheck or other payment modes, you can manually record the transaction in Quickbooks.
Quickbooks Online:
- From Unpaid Bills, click “Mark as Paid” next to the bill.
- Enter payment info like method, amount, date and click “Save and Close”.
Quickbooks Desktop:
- In Pay Bills, select the bill you paid then select “Cash” or “Check” as method.
- Enter the check number or leave blank and click “Pay Selected Bills”.
Marking bills paid keeps your books up to date.
Paying Multiple Bills in Quickbooks
Need to pay several bills at once? Quickbooks lets you select and pay multiple bills in a few clicks.
Quickbooks Online & Desktop:
- Select the checkbox next to all the bills you want to pay.
- Click the “Pay Selected Bills” or “Mark Selected Bills as Paid” button.
- Choose a payment method and amounts for each bill.
- Click “Pay Selected Bills” or “Save and Close”.
And your bills are paid in bulk!
Applying Credits to Bill Payments
If you have a vendor credit, you can apply it towards a bill payment in Quickbooks.
Quickbooks Online & Desktop:
- When paying a bill, click the “Credits” tab to view available credits.
- Check the box next to the credit(s) to apply to the payment.
- The credit amount is deducted from the total payment amount.
This reduces how much you actually owe for that bill!
Automating Bill Payments
You can save even more time by setting up automatic bill payments in Quickbooks. This way bills get paid on their own on schedule.
Quickbooks Online:
- Navigate to the Gear icon > Payments > Automatic Payments.
- Click “+ New automatic payment” and enter payment details.
- Click “Save and close”. The payment will automatically be made on the scheduled date.
Quickbooks Desktop:
- Go to Lists menu > Memorized Transactions > Memorized Transaction List.
- Click “Memorize Pay Bills” and set up payment details.
- Click “OK”. Quickbooks will automatically enter the payment on the date specified.
And that’s it! By following these steps, you can take the pain out of paying bills with the convenience of Quickbooks. Streamlining bill payment gives you more time to focus on running your business.
To recap, here are some key points on paying bills in Quickbooks:
- Review bills for accuracy before paying
- Use Quickbooks Bill Pay for easy online payments
- Record check, credit card, or cash payments
- Pay individual or multiple bills in batches
- Apply available credits to vendor bills
- Set up automatic payments for hands-free bill pay
With the ability to automate tasks and track payments, Quickbooks makes managing your company’s financial obligations a breeze. Paying bills may never be truly “fun”, but with Quickbooks, it can at least be fast and hassle-free.
Upload bills from computer
- Go to Expenses, then Bills (Take me there).
- From the Add bill ▼ dropdown, select Upload from computer.
- Drag and drop files into the Upload window, or select the Upload button to choose files on your computer.Note: QuickBooks supports PDF, JPEG, JPG, GIF, and PNG s.
The bill is added to the For review tab where you can verify the information and schedule payment or pay later.
You can also receive bills from another QuickBooks user. Accounts Payable Automation can recognize the vendor details and QuickBooks notifies you to review the bill from your Bills list.
Enter bills into QuickBooks
After you get a bill from a vendor, heres how to record it:
- Select + New.
- Select Bill.
- From the Vendor ▼ dropdown, select a vendor.
- From the Terms ▼ dropdown, select the bills terms. This is when your vendor expects to be paid.
- Enter the Bill date, Due date, and Bill no. as theyre recorded on the bill.
- Enter the bill details in the Category details section. From the Category dropdown, select the expense account you use to track expense transactions. Then enter a description. Tip: You can also enter specific products and services in the Item details section to itemize the bill.
- Enter the Amount and tax.
- If you plan to bill a customer for the expense, select the Billable checkbox and enter their name in the Customer field. Learn more about billable expenses.
- When youre done, select Save and close.
Bills added manually appear directly in the Unpaid tab. Because you added the bill, you don’t need to review it.
How to add and pay bills in QuickBooks Online
FAQ
How to pay an invoice through QuickBooks?
How do I pay an expense a bill in QuickBooks Online?