Paying bills is a necessary but time-consuming task for every business However, with QuickBooks Online Bill Pay service, you can automate and streamline bill payments right within your QuickBooks Online account This convenient bill payment service allows you to schedule, track, and pay bills without leaving QuickBooks.
In this article we’ll explore the key benefits of using QuickBooks Online Bill Pay and how it can save your business time and effort when managing vendor payments.
Overview of QuickBooks Online Bill Pay
QuickBooks Online Bill Pay is an add-on service that is integrated into your QuickBooks Online account It allows you to pay bills electronically or by check directly from QuickBooks
With Bill Pay, you can:
- Schedule one-time or recurring payments to vendors
- Pay bills by direct deposit/ACH or check
- View payment histories and statuses
- Set up approval workflows
- Get notified when bills are paid
- Avoid late fees by scheduling payments in advance
Bill Pay is available as an add-on for all QuickBooks Online subscription plans. There are three pricing tiers — Basic, Premium, and Elite — with features scaled for different business needs.
Key Benefits of Using QuickBooks Bill Pay
Here are some of the biggest reasons to use QuickBooks Online Bill Pay for your business:
1. Streamlined Bill Payment Process
Bill Pay centralizes your bill payments within QuickBooks Online, eliminating the need to use multiple systems. You can view unpaid bills in QuickBooks and seamlessly schedule payments for them right within the same workflow.
This integration saves you from having to manually enter bill payment data or export/import payment files between different software. It’s a unified, streamlined way to manage your AP process.
2. Flexible Payment Options
With Bill Pay, you have the flexibility to pay bills in the way that works best for each vendor.
For vendors who accept electronic payments, you can pay bills by direct deposit/ACH. This allows fast, secure payments directly from your bank account.
You also have the option to pay by physical check for vendors who don’t accept electronic payments. Bill Pay will print and mail checks on your behalf.
3. Scheduled/Recurring Payments
You can set up scheduled or recurring payments in Bill Pay, eliminating the need to manually pay the same bills each month.
For example, set recurring payments for fixed monthly expenses like rent, utilities, subscriptions, etc. Bill Pay will automatically send the payment each month, saving you time.
You can also schedule one-time future payments, like if you want to plan a payment before you have the funds available. It helps with cash flow management.
4. Improved Vendor Relationship
Paying bills through Bill Pay can improve vendor relationships and communication.
Vendors receive email notifications when a payment is scheduled and processed, which gives them visibility. They’ll appreciate prompt, predictable payments from your business.
It also reduces the chance of errors that could happen with manual processes. Accurate, on-time payments keep vendors happy.
5. Organization and Reporting
With Bill Pay, all of your bill payment activity is tracked within QuickBooks Online. You have a centralized dashboard to view:
- Upcoming scheduled payments
- Payment history
- Pending approvals
- Payment statuses
This makes it easy to monitor cash flow needs, run payment reports, and have details readily available for your bookkeeper or accountant.
6. Automated Workflows
You can automate workflows for requesting bill approvals in Bill Pay. Set up rules like:
- Requiring manager approval for payments over $1,000
- Needing two approvals for payments over $5,000
- Routing bills to specific departments/people based on vendor or expense account
This eliminates payment delays from waiting for approvals. Automated rules speed up the payment process while still controlling things.
Advanced approval workflows are included in the Bill Pay Elite plan.
7. Bank Account Protection
Since you’re not providing vendors with direct access to withdraw funds from your bank account, Bill Pay adds a layer of security and control compared to giving them your account information.
Your bank account details are stored securely by Intuit’s Bill Pay system. Account numbers aren’t shared directly with vendors, protecting your account information.
Bill Pay Pricing and Plans
QuickBooks Bill Pay has three pricing tiers — Basic, Premium, and Elite — to meet different business needs.
Here is an overview of the Bill Pay plans and pricing:
Basic
- $0/month
- 5 free ACH payments per month
- Additional ACH payments $0.50 each
Premium
- $15/month
- 40 free ACH payments per month
- Additional ACH payments $0.50 each
- Unlimited 1099 form filing
Elite
- $90/month
- Unlimited ACH payments
- Unlimited 1099 form filing
- Advanced workflows
The Basic plan is suitable for businesses with only a few monthly bills to pay. Premium offers more payments for medium volume needs. Elite is ideal for high payment volume and advanced needs.
There are also per-transaction fees for sending physical checks, though ACH electronic payments are recommended when possible for low cost and fast delivery.
Keep in mind you need an active QuickBooks Online subscription to use Bill Pay. It is not a standalone payment service.
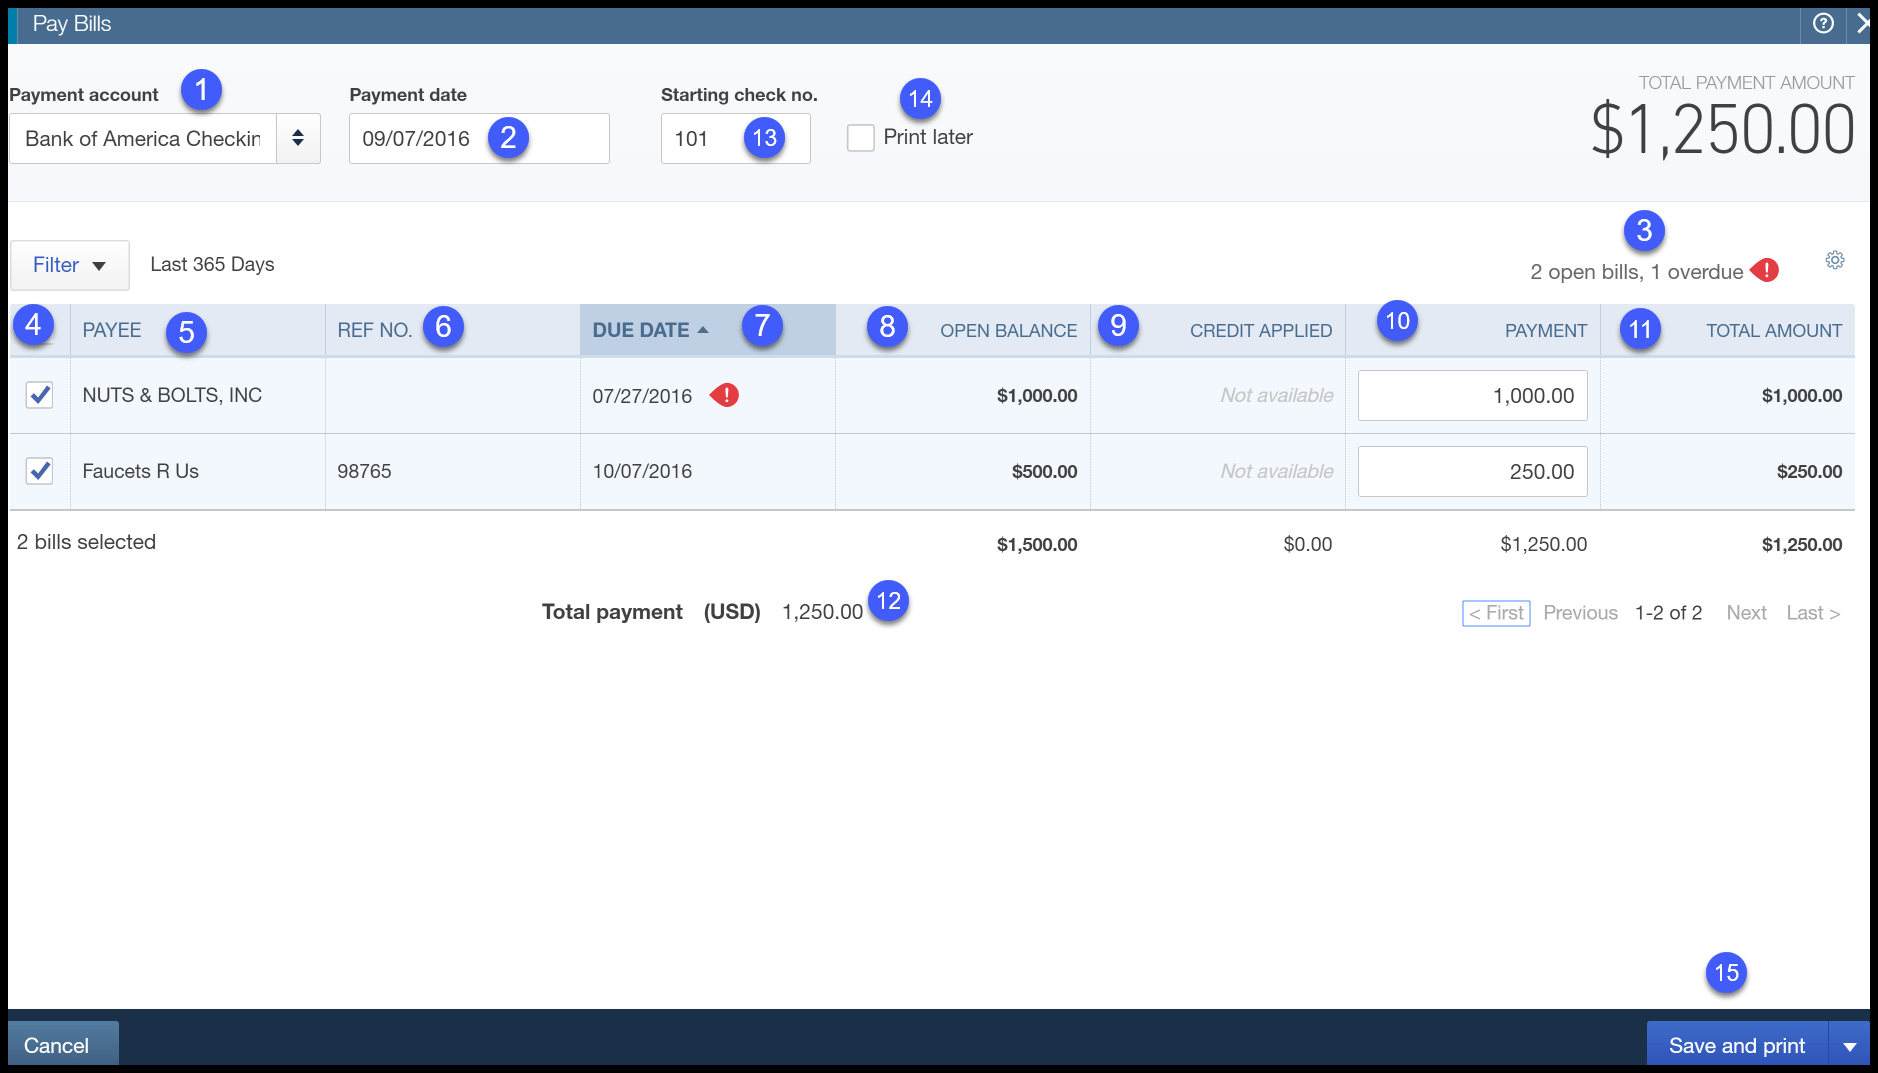
How QuickBooks Online Bill Pay Works
Here is an overview of how QuickBooks Bill Pay works from start to finish:
-
Activate Bill Pay – After subscribing through QuickBooks Online, Bill Pay gets added to your account.
-
Connect bank account – Connect the bank account you want to use to pull payments from for paying bills.
-
Import or enter bills – Bills can be imported from vendors or entered manually in QuickBooks.
-
Schedule payments – When ready to pay a bill, schedule the payment in Bill Pay. Select payment account, date, and payment method.
-
Bill Pay processes payment – On the scheduled date, Bill Pay pulls the money from your bank account and sends it to the vendor.
-
Payment details recorded – The payment gets automatically recorded in your QuickBooks account.
It’s a very straightforward process. Bill Pay handles the payment legwork while QuickBooks records the transaction.
Getting Started with QuickBooks Bill Pay
Ready to start using QuickBooks Bill Pay for your business? Here are the steps to set it up:
-
Make sure you have an active QuickBooks Online subscription plan.
-
Log into your QuickBooks Online account.
-
In the left menu, go to Settings and open Manage Bill Pay.
-
Select a Bill Pay subscription plan and enter payment details.
-
Follow prompts to connect a bank account as your payment source.
-
Review Added Services page and select Done.
-
Bill Pay will now be activated in your QuickBooks account menu!
If you need help getting started, QuickBooks customer support is available to assist you.
Now you can begin paying your bills seamlessly through QuickBooks. Simplify your payments and make bill pay day easy!
Frequently Asked Questions
Here are answers to some common questions about QuickBooks Bill Pay:
How long do electronic payments take?
ACH electronic payments typically take 1-3 business days to process. QuickBooks initiates the payment on the scheduled date.
Can I cancel scheduled payments?
Yes, you can cancel a scheduled payment anytime before 9:00 PM Pacific Time on the scheduled payment date.
Do vendors need to register with Bill Pay?
No. Vendors don’t need to register or have any direct integration with Bill Pay. They will receive emailed payment confirmations.
Are there limits on the number/amount of payments?
The number of free ACH payments depends on your Bill Pay plan. There is no limit on total payment amount beyond your available bank account balance.
What company is behind this service?
QuickBooks Bill Pay is provided by Intuit, the makers of QuickBooks accounting software. So it is a trustworthy, established service.
Sign Up for QuickBooks Bill Pay Today
If your business is still paying bills the old-fashioned, manual way, it is time to check out QuickBooks Online Bill Pay as a modern solution.
Automate your vendor payments, save time, get organized, and simplify bill pay day with Bill Pay integrated into your QuickBooks account.
The various subscription plans make it affordable for any size business to get started. See how much time and hassle you can save by letting Bill Pay handle payables for you!
Sign up today to streamline bill payment with efficiency and ease.
Help with Bill Pay
For help, reach out to Intuit Bill Pay support powered by Melio at [email protected]
Or send us a chat message. Here’s how:
- Within Bill Pay, select Need Help? Located on the page header.
- Select Send us a message in the chat dialogue that opens. The average response time shows in the chat.
Paying your first bill
When you select the option to pay, youll need to provide a one-time consent.
- Select the method that youd like to use:
- Bank account
- Debit Card For debit card transactions, the Bill Pay charges 2.9% of the total per transaction.
- Credit Card For credit card transactions, the Bill Pay charges 2.9% of the total per transaction.
- Add your bank account or credit/debit card details. For future transactions, you wont need to enter your details again.
- Choose how your vendor would like to receive their payment:
- Bank transfer (ACH): 3 business day standard delivery (4 business days for payments over $100k). Enter your vendor’s routing number and account number to process the bill payment.
- Standard Paper check delivery: typically takes 5–7 business days via USPS
- Fast Check: 3 business days via FedEx (Flat $20 fee) You can provide the name for the check and the address. The Bill Pay service will deliver the check on your behalf.
For future transactions, you don’t need to enter the details again.
- Select a schedule date
- You can select today’s date (before 11:30 AM ET) or a date in the future.
- Bill pay will deduct the payment from your account on the day you choose.
- Review the payment
- Review all the payment details.
- Make sure to schedule the payment.
- Your bill will be automatically marked as paid for the future date.
For future bill payments, follow these steps:
- Select the bill you wish to pay from the Pay bills screen.
- Select Schedule Online Payment.
- Select the bank account, credit or debit card you wish to use.
- Select a schedule date.
- Review and confirm the payment.
You can always add a new payment method. To change a vendor’s method to receive the payment, edit the method on the Review and Confirm screen.